
OneDrive is a cloud storage service made by Microsoft that is used as default storage for Windows operating system. The reason behind this is to increase productivity and also save storage space. But many users often use other storage services like Google Drive, and Dropbox to store their data. Users who do not want to store data in multiple cloud services can disable OneDrive Sync from their computer by referring to this guide on how to disable OneDrive in Windows 11.
Steps to Disable OneDrive in Windows 11
OneDrive is an in-built service and is activated when you set up your Windows 11 for the first time you bought your computer. This service automatically uploads all your data to your OneDrive account in a compressed format. This type of format is used by computers whenever you turn on your PC and also when you want to divide your disk drive. You can disable OneDrive in Windows 11 by using the methods mentioned below.
Disabling OneDrive from the Taskbar of Windows 11
You can turn off OneDrive from your Windows 11 Taskbar by following this simple workaround:
- First, click on the “OneDrive” logo in the Taskbar.
- In the pop-up menu, click on “Settings“.
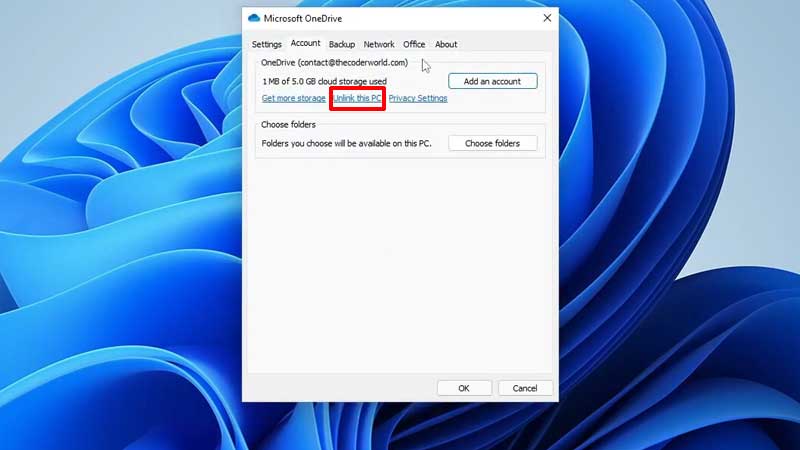
- In the next dialogue box, go to the “Accounts” tab and select “Unlink this PC“.
With this, you have successfully disabled OneDrive on Windows 11 computer.
Disable OneDrive From the Settings App
The other method you can use is to completely uninstall the OneDrive from your Windows 11 computer by following these simple steps:
- Open the “Settings” app by pressing the “Windows + I” shortcut key.
- Now, click on the “Apps” section.
- On the next page, search and click on the “OneDrive” app and click on “Uninstall“.
This is how you can uninstall the OneDrive app to disable it once and for all in Windows 11.
Disable OneDrive from the Task Manager
You can disable OneDrive while you turn on your computer by using the Task Manager utility by following this simple method:
- First, open the “Task Manager” app on your computer.
- Now, click on the “Startup” section.
- Now search and right-click on the “OneDrive” and select “Disable“.
This is all you need to know on how to disable OneDrive in Windows 11. If you want to link your account with your Microsoft account then here is a guide on Windows 11: How to link Local Account with Microsoft Account.