While taking screenshots, sometimes you end up in a situation where you want to remove and crop unwanted areas and parts of a screenshot or there is some sensitive information that is supposed to be removed for a screenshot so that it doesn’t get revealed. This guide will help you crop a screenshot on Mac directly by three simple methods without downloading or installing any additional third-party software.
Three Methods to Crop a Screenshot on Mac
If you wish to crop a screenshot on your Mac without using any third-party software, these methods can help you crop unwanted areas and tune your screenshot, etc. Follow anyone of the below methods of your preference to do it conveniently.
Method 1. Using Screenshot Cropping Tool
This is the easiest of all the native methods mentioned here. In this, after you take a screenshot on your Mac, you’ll notice a small screenshot thumbnail in the bottom-right corner of your screen instantly. However, it goes away after a few seconds, and you won’t be able to use it. Hence, you’ll have to be quick with this.
To crop using this method :
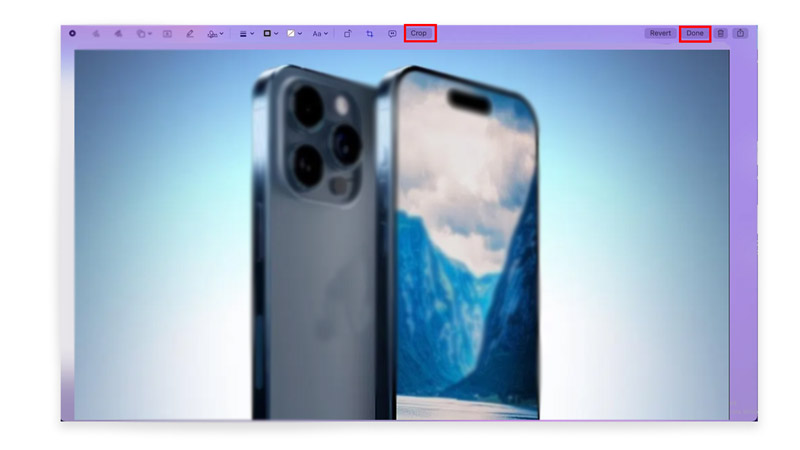
- After clicking the screenshot, click on the small thumbnail in the right bottom corner instantly.
- Tap on the ‘Crop’ (top-right) on the opened window.
- Now, select the spot you want to keep in your screenshot.
- Once finished, click ‘Done’.
Now your screenshot is cropped accordingly and saved on your Mac Home screen.
Method 2. Using Photos Application
The native Photos app is preinstalled on your macOS and is very useful if you want to do basic editing quickly. Follow the below steps to edit and crop a screenshot on your Mac using the Photos app.
- Firstly, open Photos, then click on File and select Import.
![Steps to import screenshot on photo app for crop on mac]()
- Now select the screenshot you want to edit by clicking on it from the location.
- Tap on “Import” to import the file in the Photos App. Additionally, you can tap Shift + Command+ I on the keyboard.
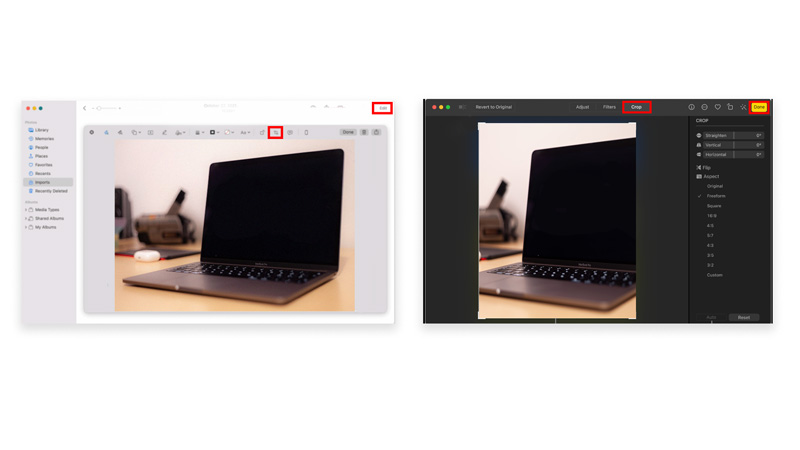
- Once imported, double-click on the screenshot to open it.
![Steps to crop screenshot on mac via photo app]()
- Now, tap on the ‘Edit’ in the upper right corner.
- Further, click on the crop option on the Select the ‘Crop’ option.
- Crop the screenshot the way you want to.
- Next, click on ‘Done’

Lastly, you can save it as a copy of the screenshot by selecting the ‘Save As A Copy’ option, this will keep the original screenshot untouched and create a new image with the crop edit you did. Alternatively, you can modify the original screenshot by clicking on the ‘Save’ option with the new crop modification you did.
Method 3. Crop Using Preview
Other than the above two methods, you can also crop a screenshot and edit it directly on your Mac. When you click on a screenshot to open it, by default the screenshot is opened in the Preview. Go through the below steps to crop from it:
- Firstly, double-click on a screenshot you wish to crop in Finder to open it in the Preview app.
- Then, select the ‘Show Markup Toolbar’ icon (shaped like a pencil) on the up toolbar.
- Now, click and drag to select the area you wish to retain.
- From the menu bar, tap on ‘Tools’ and select ‘Crop’ from the drop-down menu. Also, you can tap Command + K on the keyboard.
Now that, you are done with cropping the screenshot. Finally, you can proceed to save it.
Although these methods get the job done easily, you can use third-party software for extra cropping and editing features if required. And that’s everything covered for ways to crop a screenshot on Mac without using any third-party software. In the meantime, check out our other guides for more tips and tricks like How to Screenshot A Webpage on Mac or How to Take Screenshots of your Mac Ventura Touch Bar.