")
Virtual memory is a feature that allows Windows 11 to use some of your hard drive space as an extension of your system memory (RAM). This can help improve the performance of your PC, especially when running multiple or resource-intensive applications. However, sometimes the default settings for virtual memory may not be sufficient for your needs. Hence, to adjust Virtual Memory on your Windows 11 desktop, this guide will help you.
Windows 11: How to Adjust Virtual Memory To Improve System Performance (2023)
You can adjust virtual memory on your Windows 11 desktop, either from the Settings app or by using the Command Prompt as mentioned below:
1. Change Virtual Memory Using Settings
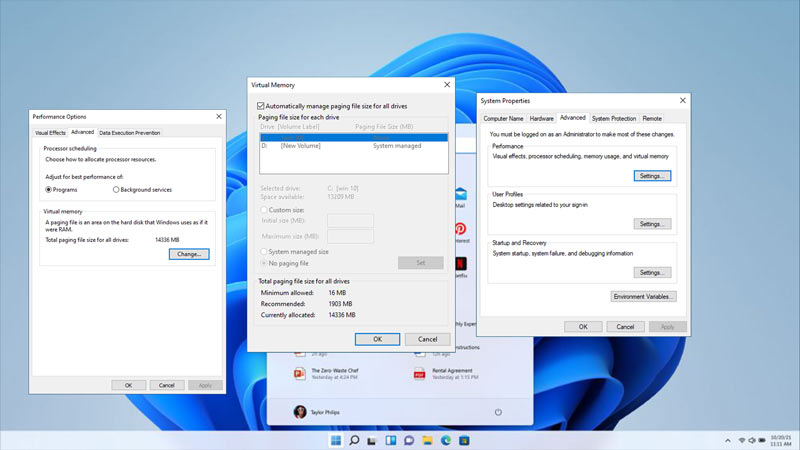
The Settings app is the easiest way to change the virtual memory size on your PC and here’s how you can do it:
- Open the Settings app by pressing the ‘Windows’ + ‘I’ keys on your keyboard and click the ‘System’ tab from the left sidebar.
- Then, scroll down, and click the ‘About’ tab on the System settings window.
- Now click the ‘Advanced system settings’ hyperlink from the ‘Related links’ section. This will open the System Property window.
- Here, go to the ‘Advanced’ tab, and click the ‘Settings’ button under the ‘Performance’ section. This will open the Performance Options window.
- Go to the ‘Advanced’ tab here, then click the ‘Change’ button under the ‘Virtual memory’ section.
- Click the ‘Automatically manage paging file size for all drives’ checkbox to uncheck it.
- Select the drive where you want to adjust the virtual memory size, then click the ‘Custom size’ option.
- Enter the initial and maximum size for the virtual memory in megabytes. The recommended values are 1.5 times and 3 times your available RAM, respectively. For example, if you have 8 GB of RAM, you can enter 12288 MB as the initial size and 24576 MB as the maximum size.
- Then click the ‘Set’ button.
- Finally, click the ‘OK’ button to save changes, then restart your PC.
2. Adjust Virtual Memory Using Command Prompt
Another easy way to increase the virtual memory on your Windows 11 desktop is by using the Command Prompt and here’s how you can do it:
- Open the Command Prompt as an administrator by searching it on the Start menu, then type the following command:
wmic pagefileset where name=”C:\\pagefile.sys” set InitialSize=12288,MaximumSize=24576
- Note that in the above command, you might need to, replace 12288 and 24576 with your desired values for initial and maximum size in megabytes, respectively. Also, replace ‘C:’ with your system drive letter if it is different.
- Then press the ‘Enter’ key on your keyboard to change the virtual memory and restart your PC.
That’s everything covered on how to adjust the virtual memory on Windows 11. Also, check out our other guides, such as How to increase dedicated Video RAM (VRAM) on Windows 10 & 11 or How to enable XMP on Windows 11.