The Windows 11 22H2 update brought the desktop stickers features that allow you to customize your background with fun and colorful images such as animals, emojis, flowers, and more. Also, some customizable options are available to make stickers appealing on your desktop. Hence, to add desktop stickers to your Windows 11 desktop, this guide will help you.
Windows 11: How to Add Desktop Stickers on your Background Image (2023)
To add desktop stickers in Windows 11, you need to have a picture or Windows Spotlight as your background option. Stickers are not available for other background options, such as solid color or slideshow. Then you can add stickers by following these steps:
- Open the Settings window by pressing the ‘Windows’ + ‘I’ keys together on your keyboard and select the ‘Personalization’ tab.
- Then click the ‘Background’ tab from the left panel on the Personalization settings window.
- Under the ‘Personalize your background’ tab, select the ‘Picture’ or ‘Windows Spotlight’ option from the drop-down list.
- Then, click the ‘Add stickers’ button next to the ‘Choose stickers for your wallpaper’ tab.
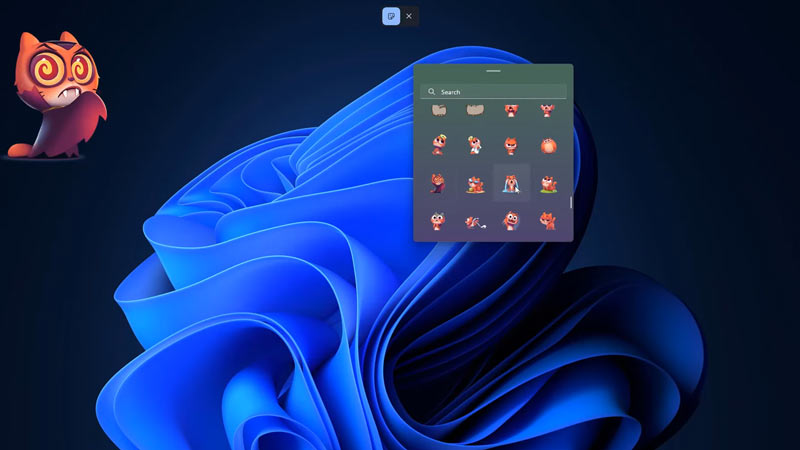
- This will open the Sticker Editor window on your desktop.
- You can see a list of available stickers on the left side of the screen.
- You can scroll down to see more categories and stickers from here.
- Drag the desired sticker from the list and drop it anywhere on your screen to add it to your Windows desktop.
- Also double-clicking on a sticker adds the same to your desktop but at the center of the screen.
- Once you are satisfied with the desktop sticker, click on ‘Save changes’ from the top right corner of the screen and your stickers will be saved as part of your background image.
How to Customize a Desktop Sticker
You can customize a desktop sticker by using resize, rotate, move, or delete options, and you can do it by following these steps:
- First, open the sticker editor by right-clicking on the desktop and selecting the ‘Add or edit sticker’ option from the context menu.
- Then, to resize a sticker, use the slider at the bottom of the screen or drag the corners of the sticker with your mouse cursor.
- Rotate a sticker by using the circular arrow icon at the bottom of the screen or right-clicking on the sticker and selecting the ‘Rotate left’ or ‘Rotate right’ options.
- You can move a sticker around by clicking and dragging it with your mouse cursor. Also, you can use the arrow keys on your keyboard to move it slightly.
- If you want to delete a sticker, you can do it by right-clicking on the sticker and selecting the ‘Delete’ option.
- Also, you can add as many stickers as you want to your desktop. When you are done editing them, click on ‘Save changes’ in the top right corner of the screen to make changes.
That’s everything covered on how to add desktop stickers on Windows 11. Also, check out our other guides, such as How to make Emojis with a computer keyboard on Windows 10 or How to use Windows 11 Emojis for Notepad.