
Once you build a world on a local server in Minecraft, it can be a bit boring to not share the modded version with your friends. However, it is not possible without Port forwarding your created server. As you port forward a server, it allows players to join your server despite not being on the same network. This process mainly allows your hosted server to allow your friends or other players to join it. But how to Port forward a Minecraft server?
Don’t worry, check out our guide to find out the steps for Port forwarding a server in this game. So, here’s everything you need to know about portforwarding a Minecraft server.
How to Port Forward for a Minecraft Server
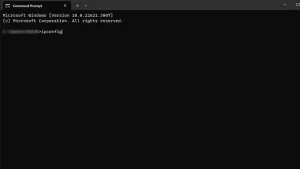
Before we start, make sure that your Minecraft server is installed and set up. You also need to find your router’s IP address for this process. For that, search for the Command Prompt and launch the application. Type in the “ipconfig” command to find out all the details of your PC’s IP address. You will find it next to the IPv4 Address by scrolling down. We also recommend noting down the Default Gateway address before starting.
Once everything’s all set, follow the below steps to port forward in Minecraft:
- Firstly, exit the Minecraft and your game server if it is active. This will prevent any errors and ensure a seamless connection.
- We need to access your router’s login page to port forward. To do so, input the address you found to the next of the Default Gateway on your web browser.
- While doing so, clear out any text on your browser’s address bar.
- As you input the address, you will be directed to your router’s login page.
- Type your username and password to log in to your Router’s profile. If you don’t have the credentials, you can contact your Internet Provider.
- Alternatively, routers mostly require default configurations. So, try typing “admin” for the username and “admin123” or “password” to log in.
- If you are logging into your router for the first time, it may take some time. You might also need to finish a tutorial or follow some instructions to set up your profile.
- Once done, assign a static IP address to your PC. This can prevent your computer’s IP address from changing if the router loses connection or changes.
- For that, press the CTRL + R buttons and type in ncpa.cpl
- Right-click on your network interface and select the Properties.
- Navigate and select the Internet Protocol Version 4 (TCP/IPv4).
- Press the Properties option and toggle the “Use the following IP address” setting.
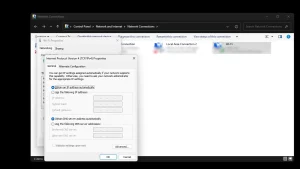
- Input your preferred IP address, subnet mask, and the Default Gateway address. If you don’t know your subnet mask, type this address into the text field: 255.255 255.0
- Then, head to your router page and look for the Port Forwarding or Virtual server options. You will be prompted with a list of options.
- Type your selected IP address from earlier into the Private IP text field.
- Enter the Minecraft server port in Private and Public Ports. The default port for Minecraft is 25565.
- It’s also worth noting to enable TCP and UDP ports.
- Save the settings and restart the Minecraft server to connect with your friends.
You can use port 25565 your PC’s IP address to access your Minecraft Server. But we recommend not sharing your IP address with everyone as it can result in serious and potential security risks. So, it is better to share your IP address only among your friends and trusted people.
That’s everything covered about this topic. If you found this guide helpful, explore more Minecraft Guides in our dedicated section right here on Technclub.