
Minecraft is a sandbox game with an open world that is massively stretched out. With the endless biomes, its vanilla version works fine with the 2 GB allocated memory. But as you add textures, mods, and various tweaks for several improvements, you might encounter some technical hitches. These include crashes, lag, screen tearing, or freezing issues while playing the game. This has got several players wondering if they can allocate more RAM to Minecraft.
Luckily, you can allocate RAM to this game for a better gaming experience with no issues. So, here’s everything you need to know.
Here’s How to Allocate More RAM in Minecraft
Before we start with allocating RAM, ensure that you have the latest version of Java Edition installed. If not, you won’t be able to add more memory or RAM to the game. Note that allocating more than half of your RAM may result in your applications not working.
So, follow the below steps:
- Launch the Minecraft launcher on your PC and navigate to the Installations tab.
- Click the three dots next to the Play button in that tab.
- Select the Edits option from the dragdown dialog box. This will prompt all the settings of Minecraft.
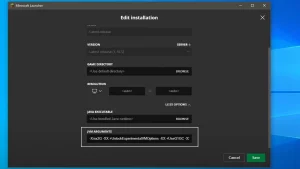
- Select the More Options button and scroll down to JVM Arguments.
- You will find the “-Xmx2G” text in the input field. The “2G” in the text indicates that 2GB RAM or memory has been allocated.
- Replace the 2G with any other number of preferred memory you want to add.
- If you want to allocate 4GB memory, replace the text with “4G” which represents 4GB.
- Once everything is set, hit the Save button to save your applied settings.
- Finally, press the Play button to get started with your game.
If you want to check your allocated memory, press the F3 button when playing it. You can view the amount of allocated RAM to Minecraft at the top-right of the screen.
That’s everything covered about this topic. If you liked this guide, check out our guides to find out if Minecraft is shutting down, how to make a server, and explore more Minecraft Guides in our dedicated section right here on Technclub.