The Terminal app is a modern and powerful tool that lets you run multiple command-line shells and applications in tabs, such as PowerShell, Command Prompt, Azure Cloud Shell, WSL, and more. Also, it supports customization options such as themes, fonts, key bindings, and profiles. On Windows 11 22H2 and above versions, the default command line app is Windows Terminal. However, if your Windows 11 PC Command Prompt opens by default instead of Terminal, you can change it with the help of this guide.
How to Set Terminal as Default Command-line app instead of Command Prompt

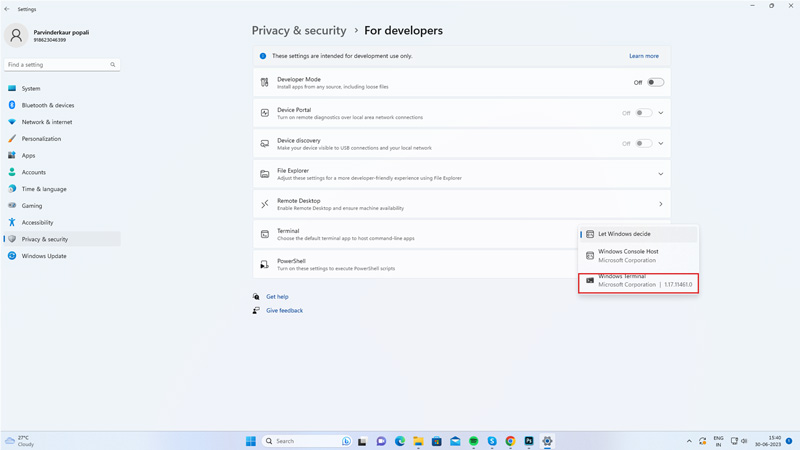
To set the Terminal as the default command-line app instead of Command Prompt on your Windows 11 desktop, you can do it from the Settings app by following these steps:
- Open the Settings app from the Start menu or by pressing the ‘Windows’ + ‘I’ keys on your keyboard.
- Click the ‘Privacy & Security’ tab from the left sidebar.
- Then select the ‘For developers’ tab.
- Finally, select the ‘Windows Terminal’ option from the drop-down.
- Now whenever you open the Command line the Terminal app will open.
Change the Default Terminal Interface on Windows 11

When you open the Terminal app, if your default Terminal interface opens to Command Prompt or Windows PowerShell, you can change it to Windows Terminal by following these steps:
- Open the Terminal by searching it on the Start menu search box.
- Then click on the down arrow from the tab and select Settings.
- Finally, set Default Profile and the Default Terminal application as Windows Terminal from respective the drop-down menu.
- Now whenever you open the Terminal app the default Windows Terminal interface will open.
That’s how you can set the default command-line app as Terminal instead of Command Prompt on Windows 11. Also, check out our other guides, such as How to make UAC prompts ask for a username or How to Fix the Command Prompt not working Error on Windows 10/11.
