
Defragmentation is a process through which you can optimize the performance of your computer by sorting all the empty files and program files stored on your computer so that it takes less time to access these files whenever asked by the user. This process deletes all the empty folders and files from your storage disk to arrange your disk systematically for processing files and programs. If you want to sort your Windows 11 storage disk then here is a guide on how to defrag your Windows 11 computer to help you.
Steps to Defrag Windows 11
Hopefully, Microsoft has an in-built utility app known as Defragment and Optimize Drivers that can help you defragment your disk drive. You can follow the below-mentioned steps to defrag your Windows 11 computer. Before starting with the steps it is recommended for only Hard drives and not SSD drives.
Defragment Windows 11 Using Defragment and Optimize Drivers Utility
You can open Defragment and Optimize Drivers by following these simple steps:
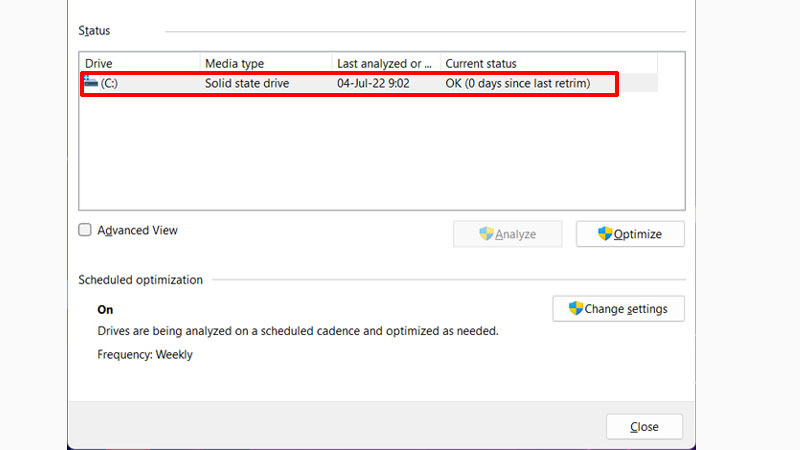
- Open the “Start Menu” and search “Defragment and Optimize Drives“.
- Now in the utility app, select the drive you want to defrag and click on “Optimize“.
With this, you have successfully defragged your Windows 11 computer.
Defrag Windows 11 Using Settings App
If you cannot see Defragment and Optimize Drives in the search menu then you can try this method to defrag your computer:
- Open the “Settings” app on your computer.
- Now, go to the “System” section and then click on the “Storage” section.
- Here, click on “Advanced Storage Settings“.
- Here, select “Drive Optimization“.
This will open the same Utility app. Here, select the disk drive you want to defrag and click on “Optimize“.
Defrag Disk Drive Using Command Prompt
You can defrag your storage drives using Command Prompt by following these steps. With this, you can also check whether there is a need for defragmentation for your hard disk:
- Open the “Command Prompt” app.
- In “Command Prompt“, type “defrag<disk letter>:/ A” without quotes and press “Enter” key.
- This will show free storage space and also the fragmented space and whether you should fragment this part of your hard disk.
- If you want to defrag the entire hard disk then type “defrag<disk letter>” and hit the “Enter” key.
This is how you can defrag your storage drive on your Windows 11 computer. If you want to divide the hard drive of your Laptop that is running on Windows 11, then here is a guide on How to Partition Laptop Hard Drive on Windows 11.