
As you might already know, Windows Defender is an antivirus software that is part of Windows Security, which is basically Microsoft’s security solution integrated by default in Windows 10. It offers real-time protection against malware, viruses, and another kind of software and threats. However, if you are using paid antivirus software on your PC, you can easily turn off Windows Defender also. In this guide, I will explain how you can disable Windows Defender in your Windows 10 computer easily.
How to disable Windows Defender in Windows 10 PC
Windows Defender antivirus comes preinstalled in Windows 10 that protects your PC against malicious software such as viruses, spyware, and other potentially unwanted software. There are many kinds of malware that can install itself on your PC without your knowledge, either when you surf the Internet, or when you install certain programs, or when you open an attachment in an email, etc.
Therefore, in this tutorial, we are going to find out how to completely disable Windows Defender antivirus on your Windows 10 PC.
In this tutorial, we are going to see how to completely disable Windows Defender Antivirus on your Windows 10 PC. For this, there are various methods available. Follow the procedures given below to turn off Windows Defender in Windows 10.
Method 1: Disable Windows Defender via Registry Editor
- First of all, click on the Search bar and type Run.
- Open the Run app and type “Regedit” without quotes and press Enter key.
- Navigate to the following key: HKEY_LOCAL_MACHINE\SOFTWARE\Policies\Microsoft\Windows Defender.
- After that, just make a 32-bit DWORD value with the name DisableAntiSpyware.
- Now you need to change the value of DisableAntiSpyware to 1 to disable Windows Defender antivirus.
- Once you have done with the above procedure, restart your computer.
- Finally, you will notice that Windows Defender is now disabled on your Windows 10 PC.
- To re-enable Windows Defender, simply remove the DisableAntiSpyware 32-bit DWORD value.
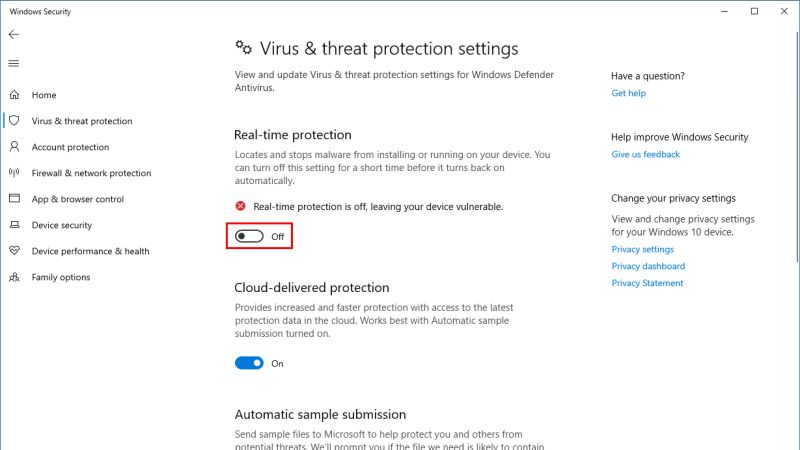
Method 2: Via Windows Security
- First, you need to click on the Start button.
- In the Search bar, type Windows Security and then click on it to open the app.
- Next, you have to click on Virus & threat protection.
- Under the same settings of “Virus & threat protection”, simply click the Manage settings option.
- Finally, toggle the Real-time protection to switch off Windows Defender on your Windows 10 PC.
That is everything you need to know about how to disable Windows Defender in Windows 10. Also, do not forget to check out how to check Graphics Card on Windows 10, and how to make a .bat file.