If you love video games and mostly play from the PC, you must be surely knowing that graphics cards play a very important role in gaming. In fact, in order to play games, your PC needs full compatibility with the minimum requirements and specifications recommended by the game developer, including the power of the video card. Therefore, before purchasing a video game, it may be useful to check if your video card is in line with the parameters required by the latter. In this guide, I will explain the different methods to check your graphics card on Windows 10.
How to check Graphics Card information on Windows 10 (2023)
If you want to identify the graphics card on your Windows 10 PC, you have the various options available: it is up to you to select the one that best suits your needs. For example, if you just want to know the name of the graphics card, the Windows 10 tools will be more than enough.
On the other hand, if you want more detailed information about your video card, you will have to install additional free software. In any case, you do not have to worry, as you just need to read the methods I have described below to find out which one is right for you.
Method 1: Windows 10 Device Manager
One of the fastest and easiest methods to see your PC’s graphics card is to use the Windows 10 Device Manager tool. First, search for Device Manager in the Search bar, and from the results appearing, click on it to open Device Manager. Once this is done, all you need to do is just click on Display adapters to know the name of the video card mounted on your PC.
Method 2: Open DxDiag to View Graphics Card Information
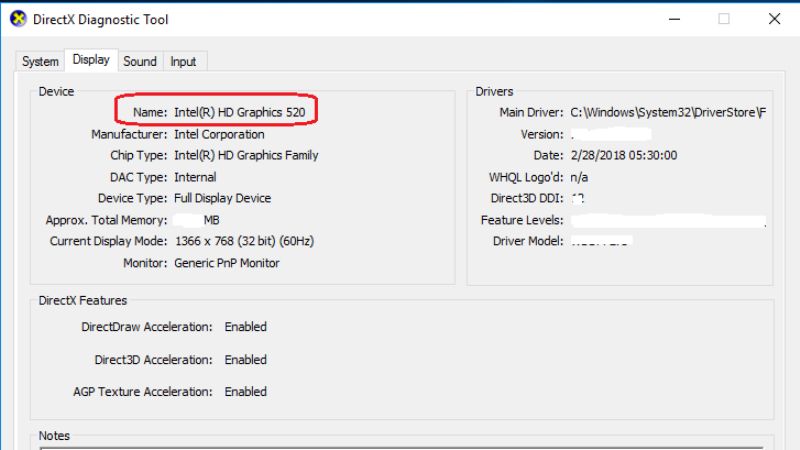
There is another useful tool called DxDiag that is capable enough to help you in this area. The latter allows you to find out the compatibility of your system with various DirectX released by Microsoft. To open DxDiag, here are the steps:
- Press Windows + R keys together on your keyboard.
In the Run command that opens, type “dxdiag” without quotes and click ok.
Once a new window appears, you just have to click on the Display tab at the top. Here you will find out all the information related to your graphics card.
If you have an additional graphics card, you can also click on the Render tab to find out the second video card installed on your system.
Method 3: System Information to check Graphics Card details
Another way to know the name of the video card installed on your PC is the System Information tool. Follow the steps given below to open System Information to check your graphics card.
- First, you just have to search for System Information in the search bar of the Start menu and click on the result that appeared.
- A new window will open, here you will have to expand the Components section by clicking on the “+” symbol.
- At this point, you will need to find the Display entry in the list.
- Once you click on Display, on the right side you will see various information regarding the video section of your PC, including the name of the graphics card, mounted there.
Method 4: GPU-Z
You can also use a software called GPU-Z that will allow you to access various information about the graphics card installed on your PC. With this software, you will not only know the model of your video card, but it will also allow you to obtain other information such as the amount of dedicated RAM, the operating frequency, and various operating data. It will also allow you to find out the fake GPUs, or counterfeit graphics cards sold as new.
That is everything you need to know about how to check what graphics card is installed on your Windows 10 PC. While you are here, you might be also interested to know how to make a batch file on Windows and how to fix DRIVER_POWER_STATE_FAILURE error.